Setting Up a G Network for Network Switches
Setting up a G network for network switches is a crucial part of establishing a stable and efficient network infrastructure. In this article, we will walk you through the process of setting up a network switch and provide tips on how to get the best performance out of your network.
Network switches are the unsung heroes in many small-to-medium business networks. They power access points, VoIP phones, and security cameras, and let you fine-tune how traffic moves through your network. A good network switch can help to improve network speed, reduce congestion, and increase overall performance.
When setting up a network, the first step is to choose the right switch. There are many types of switches available, including managed, unmanaged, and smart switches. Managed switches offer advanced features such as VLANs, QoS, and monitoring, while unmanaged switches are simple and easy to install. Smart switches, on the other hand, offer a combination of managed and unmanaged features.
- Consider the size of your network: If you have a small network, an unmanaged switch may be sufficient. However, if you have a larger network, a managed or smart switch may be a better option.
- Think about the type of traffic your network will handle: If you have a lot of voice and video traffic, you may need a switch with advanced QoS features.
- Consider the level of management you need: If you need to monitor and manage your network, a managed switch may be a better option.
Once you have chosen the right switch, the next step is to set it up. This involves connecting the switch to your router and configuring the settings. Here are the basic steps:
1. Connect the Switch to the Router

Furthermore, visual representations like the one above help us fully grasp the concept of Setting Up A G Network For Network Switches.
Connect the switch to the router using an Ethernet cable. Make sure the cable is securely connected to both the switch and the router.
2. Configure the Switch Settings
Configure the switch settings according to your needs. This includes setting up the VLANs, QoS, and monitoring features. Consult the switch's manual for specific instructions on how to configure these settings.
4. Test the Network
Test the network to ensure that it is working properly. Use tools such as ping and traceroute to test connectivity and identify any issues.
Setting up a LAN network is a bit more complex than setting up a network switch. However, the basic steps are the same:
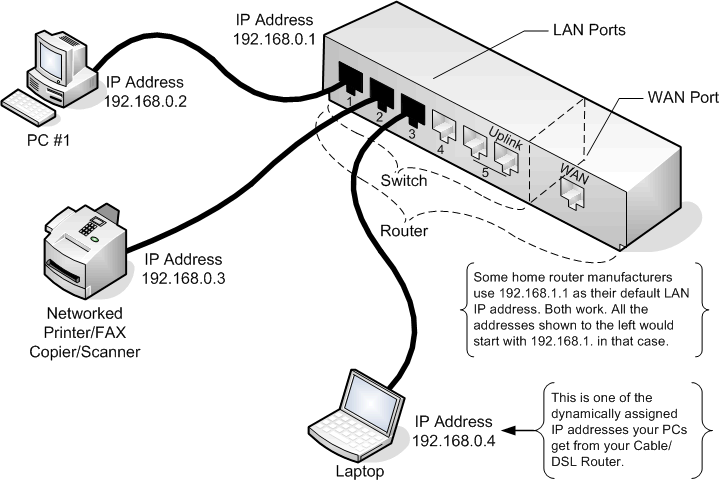
Such details provide a deeper understanding and appreciation for Setting Up A G Network For Network Switches.
Plan the network layout and decide on the type of devices and equipment you will need. This includes switches, routers, and network cards.
2. Choose the Switch
Choose the right switch for your network. Consider the size of the network, the type of traffic it will handle, and the level of management needed.
3. Set Up the Switch
4. Connect Devices to the Switch
5. Test the Network

Test the network to ensure that it is working properly. Use tools such as ping and traceroute to test connectivity and identify any issues.
Conclusion
Setting up a G network for network switches is a crucial part of establishing a stable and efficient network infrastructure. By choosing the right switch and configuring the settings correctly, you can improve network speed, reduce congestion, and increase overall performance. In this article, we have provided a comprehensive guide on how to set up a network switch and a LAN network.
Regularly monitor the network to identify any issues and resolve them quickly.
2. Update the Firmware
Update the firmware of your switch and other network devices regularly to ensure that you have the latest security patches and features.


%20-%20220G2V.png "Network Devices - GeeksforGeeks")