How to Take a Screenshot on Mac with AirDrop: A Step-by-Step Guide
Introduction
Taking a screenshot on your Mac can be a useful skill, and when combined with the AirDrop feature, it becomes even more convenient. In this article, we will explore how to take a screenshot on Mac with AirDrop, which allows you to quickly share files, photos, and more between nearby Apple devices. AirDrop is a feature developed by Apple that enables users to share files, photos, and more between devices that are nearby. It uses Wi-Fi and Bluetooth connectivity to facilitate seamless file transfers. AirDrop is available on all Apple devices, including iPhones, iPads, and Macs.Why Take a Screenshot on Mac with AirDrop?
This particular example perfectly highlights why Screenshot On Mac With Airdrop is so captivating.
Taking a screenshot on Mac with AirDrop offers several benefits, including: * Easy file sharing: With AirDrop, you can quickly share files, photos, and more between nearby devices. * Convenience: AirDrop eliminates the need to use cables or cloud services to transfer files. * Security: Transfers are encrypted for security, ensuring that your files are safe and secure.Step-by-Step Guide to Taking a Screenshot on Mac with AirDrop
To take a screenshot on Mac with AirDrop, follow these steps:Alternative Method: Using Screenshot App

Furthermore, visual representations like the one above help us fully grasp the concept of Screenshot On Mac With Airdrop.
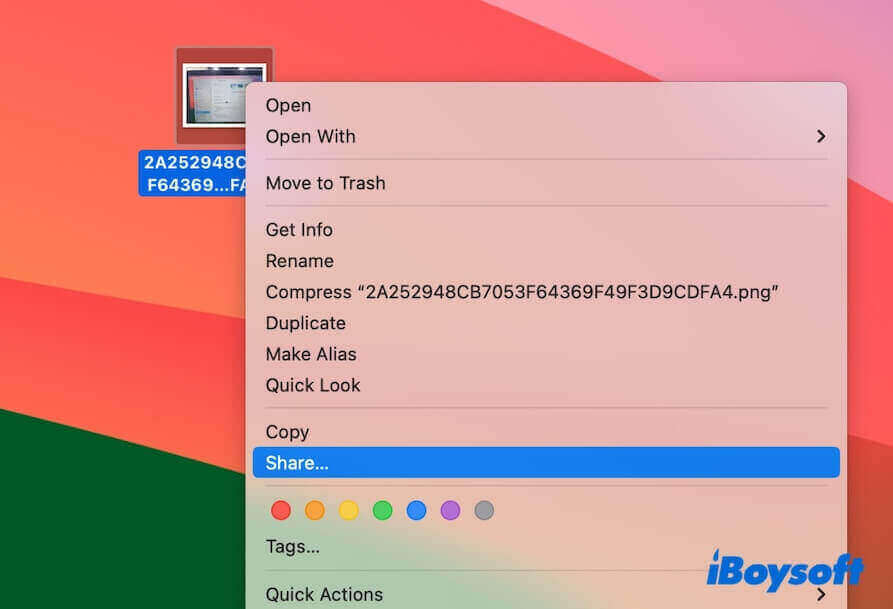
If you're using macOS 10.15 or later, you can use the Screenshot app to take a screenshot and then share it via AirDrop. Here's how:- Take a screenshot using the Screenshot app, which can be found in the Launchpad.
- Open the Screenshot app and select the screenshot you just took.
- Click on the "Share" button and select "AirDrop" from the list of options.
- The screenshot will be automatically sent to your iPhone or iPad via AirDrop.
Conclusion

Moving forward, it's essential to keep these visual contexts in mind when discussing Screenshot On Mac With Airdrop.
Taking a screenshot on Mac with AirDrop is a quick and easy way to share files, photos, and more between nearby Apple devices. With AirDrop, you can eliminate the need for cables or cloud services and ensure that your files are secure and safe. By following the step-by-step guide outlined in this article, you can start using this feature today and make the most of your Apple devices.Additional Tips and Tricks
* Make sure that Wi-Fi and Bluetooth are turned on on both your Mac and your iPhone or iPad. * If you're having trouble sharing files via AirDrop, try restarting both devices or resetting the AirDrop settings. * You can also use AirDrop to share files between Macs, iPhones, and iPads. * Always make sure to check the compatibility of your devices before sharing files via AirDrop.FAQs
- Q: What is AirDrop?
A: AirDrop is a feature developed by Apple that enables users to share files, photos, and more between devices that are nearby.
- Q: Why use AirDrop to share files?
A: AirDrop offers a convenient and secure way to share files between nearby Apple devices.
- Q: How do I take a screenshot on Mac with AirDrop?
A: To take a screenshot on Mac with AirDrop, follow the step-by-step guide outlined in this article.


 - Mashable ME")


